
Pair a Bluetooth receipt or kitchen printer with your Cloud Hub device in a few taps.
Before you start, you'll need:
- A Bluetooth printer, charged or powered on and in pairing mode.
- Bluetooth switched on for the Cloud Hub device.
- A manager PIN to access Settings on the device.
Step 1: Put the printer into pairing mode and open Printing Settings
Turn the Bluetooth printer on and put it into pairing/discoverable mode (check the printer's manual — this is often a long-press on a Bluetooth button). Make sure Bluetooth is switched on for the Cloud Hub device itself. Then on the device, tap your name, then Settings, then Printing Settings under Operations, then + Add printer.
Step 2: Let Cloud Hub scan, then select your printer
Cloud Hub scans for Bluetooth printers automatically alongside USB ones. Your printer appears labelled Bluetooth, with its device name and MAC address (for example 10:23:B1:26:9A:66). Tick the checkbox next to it.
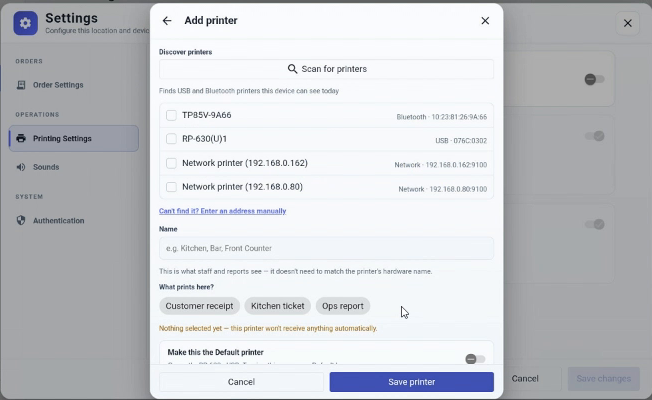
TP85V-9A66 discovered over Bluetooth, alongside USB and network printers.
Step 3: Give it a name
The Name field fills in with the printer's Bluetooth device name. Rename it to something your staff will recognise, such as Kitchen or Till 2.
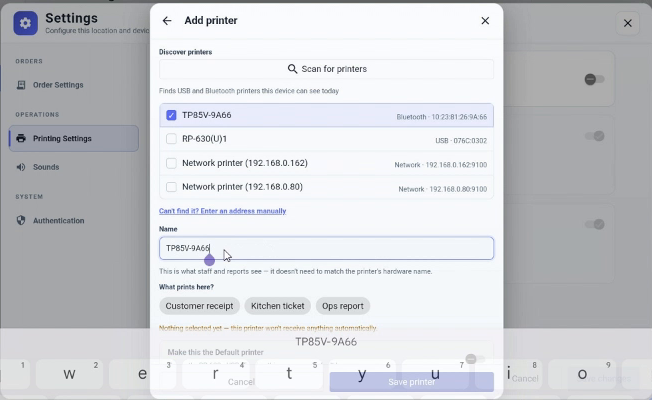
Bluetooth printer selected — rename it from its device name to something staff will recognise.
Naming tip: Include the printer's physical location in its name — for example Kitchen, Bar or Counter — rather than leaving the Bluetooth device name in place. It's the quickest way for staff to tell printers apart once there's more than one set up, both on screen and when troubleshooting.
Step 4: Choose what prints here, then save
Under What prints here?, choose which document type(s) this printer should handle — for example Kitchen ticket for a printer mounted by the pass. Tap Save printer.
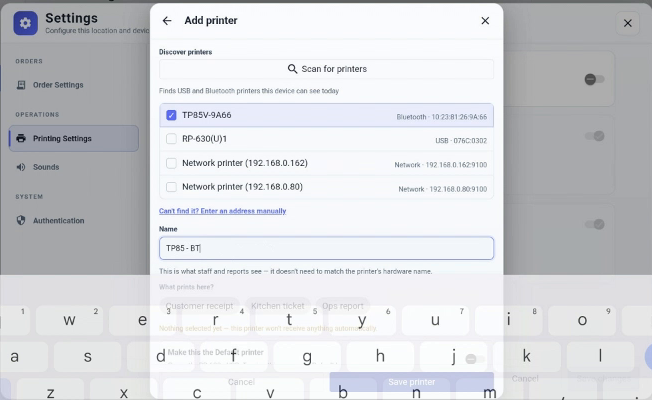
Renamed to “TP85 - BT” and assigned to Kitchen ticket.
Step 5: Confirm it's in your printer list
Your Bluetooth printer now appears in the Printers list with its connection type and assigned document types, alongside any USB or network printers already set up.
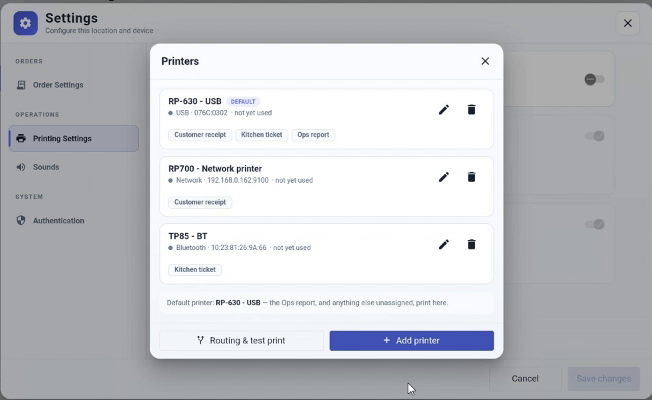
TP85 - BT added — all three printers (USB, network and Bluetooth) are now configured on this device.
Check the routing, then run a test print
Once a printer is saved, open Routing & test print from the Printers screen to see, at a glance, which printer each type of document is going to — and to send a test print straight to it.
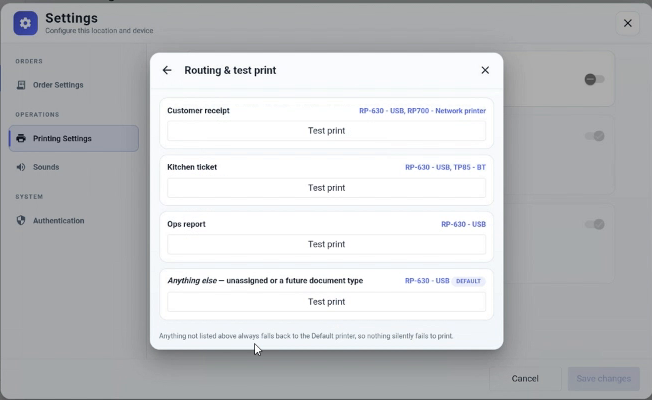
Routing & test print — shows every document type and which printer(s) currently handle it.
| Document type | Printer(s) it currently routes to |
|---|---|
| Customer receipt | RP-630 - USB, RP700 - Network printer |
| Kitchen ticket | RP-630 - USB, TP85 - BT |
| Ops report | RP-630 - USB |
| Anything else — unassigned or a future document type | RP-630 - USB (Default) |
Anything not listed above always falls back to the Default printer, so nothing silently fails to print.
Printer not showing up in the scan? Bluetooth printers usually need to be in pairing mode every time before Cloud Hub can find them for the first time — check the printer isn't already paired to another device, and that it has enough battery or is on mains power.
Bluetooth printers can drop out of range. Keep the printer within normal Bluetooth range of the Cloud Hub device (a few metres, fewer through walls). If it regularly goes offline, a USB or network connection is more reliable for a busy counter or kitchen.